


Pharaoh Isle: The Ancient Tombs
near Pharaoh Isle · 3 floors underground
Information
| Area | near Pharaoh Isle | Type | major quest |
| Min. level | 75 | Premium | no |
| Difficulty | very hard | Completed by | 0 players |
| Location | 3 floors underground, near Pharaoh Isle | ||
| Requirements | voyage from level 60 (Captain Aphigri in Karahan Desert), gate to Ashmunrah's hall from level 75, 2 scarab coins (to go down to the lower floors) | ||
| Mode | solo / team | ||
| Reward |  | ||
| Monsters on the way and on site | |||
| Description | A desert island near Karahan Desert. Below the Great Pyramid lie the tomb mazes of seven pharaohs. Every tomb hides a puzzle, and behind it a sarcophagus with one part of the Helmet of the Ancients. At the very bottom, behind the gate and Ashmunrah's hall, the seven parts merge into the helmet. The quest is modelled on Tibia's "The Ancient Tombs Quest". | ||


Rewards
Helmet parts (one from the sarcophagus in every tomb, once per character) Helmet Adornment (Omruc)
 Gem Holder (Thalas)
 Damaged Helmet (Dipthrah)
 Helmet Ornament (Mahrdis)
 Left Horn (Vashresamun)
 Right Horn (Morguthis)
 Helmet Piece (Rahemos)
Helmet Adornment (Omruc)Gem Holder (Thalas)Damaged Helmet (Dipthrah)Helmet Ornament (Mahrdis)Left Horn (Vashresamun)Right Horn (Morguthis)Helmet Piece (Rahemos)Helmet of the Ancients - the seven parts merge in Ashmunrah's treasury (once per character)Helmet of the Ancients
Helmet of the AncientsEvery quest chest can be opened only once per character.
Required items and notes
- 2 scarab coins - dropped by Scarabs and Ancient Scarabs on the island (rarely, collect them on the way).
- An antidote or anti-poison spell is useful only after Thalas' tomb (there the poison is required).
Uncover the secret of the quest
Click to uncover the secret of the quest: the route step by step with maps
1
Sail to Pharaoh Isle (200 gp, level 60+). Ships go there e.g. from captains: Captain Aphigri (Karahan Desert).
2
Surface: walk approx. 58 tiles north-east to the entrance of the Great Pyramid (red cross).

3
Enter the pyramid hall through the double door and go down the stairs at the back of the hall (between the statues).
Entering the tombs
4
From the pyramid hall go down the stairs to floor -1 (S on the map). You can also go down through one of the two ruins in the desert (south and east of the island) - you will land elsewhere in the same maze.
5
Floor -1 is a huge maze with many dead ends. The tombs lie on its edges: O Omruc, T Thalas, D Dipthrah, G Morguthis. $ is the basin for the scarab coin (the way down). Monsters: Mummy, Crypt Shambler, Demon Skeleton, Necromancer, Bonebeast - the further from the entrance, the stronger.

6
Going down: stand on the blue flame next to the basin ($) and put a scarab coin on the basin - you are moved one floor down. The coin is consumed. Next to the arrival spot below there is a field that takes you back up.
7
Floor -2: the tombs of M Mahrdis, V Vashresamun, R Rahemos and another coin basin ($). Monsters: Dread Beast, Ancient Scarab, Undead Gladiator, Lich.

Omruc's tomb (floor -1)
8
Omruc's tomb - the invisible maze. The hall looks empty, but only one path is real: every other tile throws you back to the start. Walk along the blue tiles from the map to the force field (P) at the end.

9
The force field takes you to the chamber with the sarcophagus (red cross). Open it and take the helmet part. Traps shoot in the chamber - do not linger. The field in the corner leads back to the tomb entrance.
Thalas's tomb (floor -1)
10
Thalas' tomb - levers and the mark of the cobra. Turn all 8 levers (1-8) within 4 minutes (a counter shows your progress). Then step on the cobra plate (K) - you get poisoned. Do not cure the poison and enter the force field (P): it only lets poisoned players in.
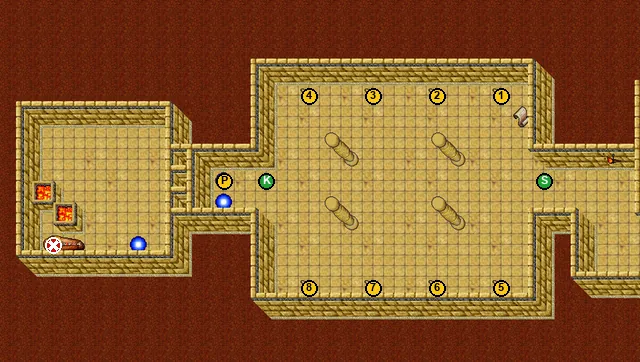
11
The force field takes you to the chamber with the sarcophagus (red cross). Open it and take the helmet part. Traps shoot in the chamber - do not linger. The field in the corner leads back to the tomb entrance.
Dipthrah's tomb (floor -1)
12
Dipthrah's tomb - the doors with words. A parchment with a word lies before every door. The verse at the entrance tells which words are right: endless, pale-faced, deceased, unholy, doomed, righteous, sharpened, mortal - in order in the 8 halls. Wrong doors throw you back to the start. On the map the right doors have green numbers.

13
The force field takes you to the chamber with the sarcophagus (red cross). Open it and take the helmet part. Traps shoot in the chamber - do not linger. The field in the corner leads back to the tomb entrance.
Morguthis's tomb (floor -1)
14
Morguthis' tomb - the blue flames. A small maze guarded by Deathslicers (traps). Walk through all 4 blue flames (1-4, any order) and only then enter the force field (P). Leaving the tomb resets the flames.

15
The force field takes you to the chamber with the sarcophagus (red cross). Open it and take the helmet part. Traps shoot in the chamber - do not linger. The field in the corner leads back to the tomb entrance.
Mahrdis's tomb (floor -2)
16
Mahrdis' tomb - the purple fires. Every few seconds the floor bursts into purple fire (300 damage). Only the grey stones (green on the map) are safe - walk on them to the force field (P) and wait out the bursts on them.

17
The force field takes you to the chamber with the sarcophagus (red cross). Open it and take the helmet part. Traps shoot in the chamber - do not linger. The field in the corner leads back to the tomb entrance.
Vashresamun's tomb (floor -2)
18
Vashresamun's tomb - the queen's song. Play the instruments in the order of the verse: lyre (1), drum (2), panpipes (3), lute (4), fanfare (5). A mistake starts the song again. Once the song succeeds you have 10 minutes to enter the force field (P).

19
The force field takes you to the chamber with the sarcophagus (red cross). Open it and take the helmet part. Traps shoot in the chamber - do not linger. The field in the corner leads back to the tomb entrance.
Rahemos's tomb (floor -2)
20
Rahemos' tomb - three levers. One of the levers (random every time) crumbles the wall (Ś) for 30 seconds, the others hurt (200 damage). Pull until the wall disappears and quickly go to the force field (P).

21
The force field takes you to the chamber with the sarcophagus (red cross). Open it and take the helmet part. Traps shoot in the chamber - do not linger. The field in the corner leads back to the tomb entrance.
Ashmunrah and the Helmet of the Ancients (floor -3)
22
From the basin ($) on floor -2 go down with a coin to floor -3 (S). Cross the maze to the gate (B) - it lets in from level 75. Behind it is Ashmunrah's hall (respawns every 2 hours) with a Behemoth, 4 ghosts and 4 Magicthrowers.
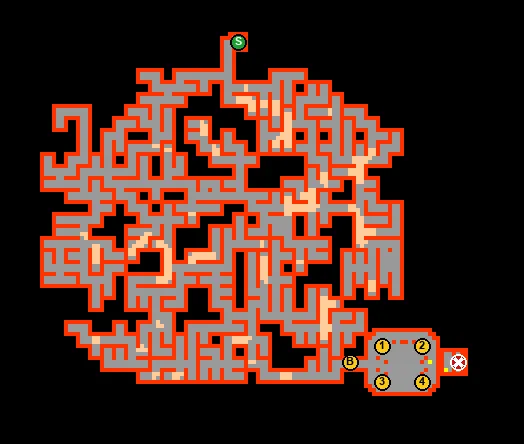
23
Turn all 4 levers in the hall (1-4) to the right and enter the force field at the end of the hall - it takes you to the treasury. If any lever points left, the field throws you back.
24
In the treasury step on the field in the middle with all 7 helmet parts in your backpack - they merge into the Helmet of the Ancients. The helmet can be obtained only once per character.


